

Most people burn their first ₹5,000 on Meta ads in about three days. They boost a post, pick “India, 18 to 65+”, add a vague caption, and then stare at the numbers wondering why 40 people liked the post and nobody bought anything. That isn’t an ad problem. It’s a setup problem, and it’s fixable.
This guide explains how to create a Meta Ads campaign from an empty Ads Manager screen to a live, tracked, optimized campaign. Meta Ads is the system that runs paid promotion across Facebook, Instagram, Messenger, WhatsApp and the Audience Network. It has more buttons than a TV remote, and half of them don’t matter when you’re starting. We’ll cover the ones that do, in the order you’ll actually meet them.
Nothing here assumes you’ve run an ad before. Every term gets explained the first time it shows up, and every step comes with the reason behind it and the mistake people usually make there. By the end, you’ll know how to set up your accounts, choose an objective, build an audience, set a budget, design creative that gets watched, and read the results without panicking. Grab a coffee, open Ads Manager in another tab, and follow along. It works better that way.
TL;DR
- Meta campaigns have three levels: campaign (objective), ad set (audience, budget, placements) and ad (creative and copy). Get the level right and half of the confusion disappears.
- Pick the objective that matches the business result you want, not the one that sounds closest. “Sales” for sales, “Leads” for enquiries, “Traffic” almost never.
- Install the Meta Pixel and Conversions API before you spend a rupee, or the algorithm has nothing to learn from.
- Start with one campaign, two or three ad sets and three to five creatives. Anything bigger on a small budget just splits your data into useless crumbs.
- Leave a new ad set alone for at least 3 to 4 days. Editing it every morning resets learning and costs you money.
- Creative matters more than targeting now. The first 3 seconds of your video do more work than any interest you select.
What You Will Learn in This Guide
This guide is built so you can read it start to finish or jump to the part that’s blocking you right now. Here’s what’s inside:
- What you must set up before opening the campaign screen: Business Portfolio, Page, ad account, payment method, domain and tracking.
- How to choose between Meta’s six campaign objectives without guessing.
- The exact nine steps to build a campaign in Ads Manager, from naming it to hitting publish.
- How budgets, bid strategies and the learning phase work, in plain language.
- How to build audiences with Advantage+ audience, custom audiences and lookalikes.
- How to make ad creative and copy that people actually stop for, with real examples.
- How to read results, decide what to fix, and scale without breaking what works.
- The mistakes that quietly drain budgets, and a set of FAQs at the end for the questions beginners keep asking.
Before You Start: What You Need to Create a Meta Ads Campaign
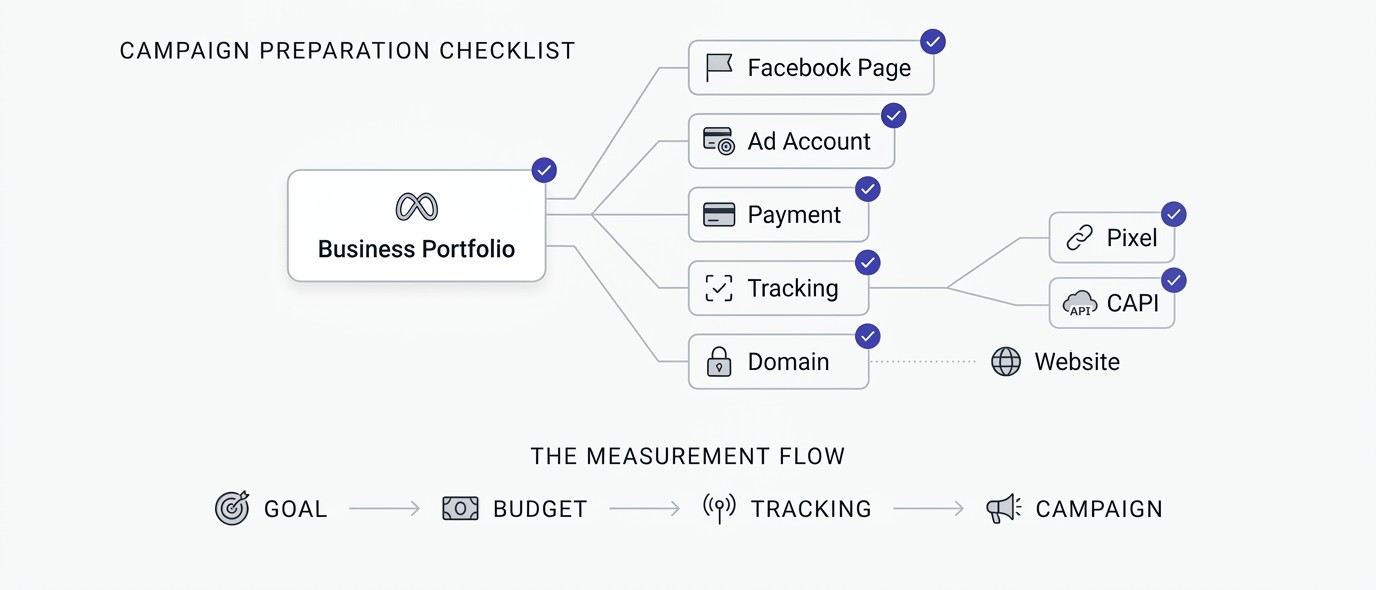
Before you create a Meta Ads campaign, you need five things in place: a Meta Business Portfolio, a Facebook Page, an ad account with a working payment method, a verified domain if you send people to a website, and tracking installed. Skipping any of these is how people hit “account restricted” errors or run ads blind. Spend an hour here and the actual campaign build gets easy.
Set Up Your Meta Business Portfolio and Facebook Page
A Meta Business Portfolio (the thing most people still call Business Manager) is the container that holds your Pages, ad accounts, pixels and team permissions. Go to business.facebook.com, create one using your business name, and add your official email. Use a business email if you can, because a portfolio tied to a personal account that later gets restricted can take your ads down with it.
Your Facebook Page is the identity your ads speak from. Even if you only care about Instagram, ads get set up through a Page connection. Add a profile photo, cover image, a short description, your website and contact details. Then connect your Instagram professional account inside the portfolio’s Accounts settings. People do check these. An ad from a Page with no photo and zero posts looks like a scam, and viewers treat it like one.
Create Your Ad Account, Payment Method and Roles
Inside the Business Portfolio, open Settings, then Accounts, then Ad Accounts, and add a new one. Set the right currency and time zone straight away, because both are permanent. Pick INR if you’re billing from India. Choosing USD by mistake and paying forex fees for a year is a classic regret.
Then add a payment method. Indian cards and UPI work, but recurring payment rules from banks can decline charges, so keep a backup option. Meta charges when your spending hits a threshold, not once a month. Also check roles: you should be an admin, your Page should be assigned to the ad account, and anyone helping you gets only the access they need. Don’t hand out full control to a freelancer you met last week.
Install the Meta Pixel and Conversions API
The Meta Pixel is a small piece of code on your website that reports what visitors do: view a page, add to cart, buy, submit a form. The Conversions API (CAPI) sends the same events directly from your server, which helps when browsers or iPhones block the pixel. Together they feed Meta’s system the signal it needs to find more people like your buyers. Without them, you’re asking the algorithm to find customers while blindfolding it.
Open Events Manager, create a dataset (Meta now bundles the pixel into this), and connect your website. Shopify, WooCommerce and WordPress all have native integrations that take about ten minutes. Then install the Meta Pixel Helper Chrome extension and click through your own site. If a Purchase or Lead event doesn’t fire, fix it now. If you want a fuller picture of how site tracking works, the web development learning hub covers analytics setup and technical basics in plain language.
Verify Your Domain and Choose Your Goal and Budget
Domain verification proves your business owns the website you’re advertising. In Business Settings, open Brand Safety, then Domains, add your domain, and verify it with a DNS record or a meta tag. It also gives you control over which conversion events you can optimize for, which matters for iPhone traffic.
Now the part nobody wants to do: decide what success looks like in numbers. Say you sell handmade candles at ₹799 and make ₹350 profit per sale. You can afford to pay up to roughly ₹350 to get a customer and still break even on the first order. Anything below that is profit. That number, your break-even cost per purchase, is the compass for every decision later. Start with a test budget you can lose without panic, usually ₹500 to ₹1,000 a day, or whatever fits your cash.
How to Create a Meta Ads Campaign Step by Step in Ads Manager
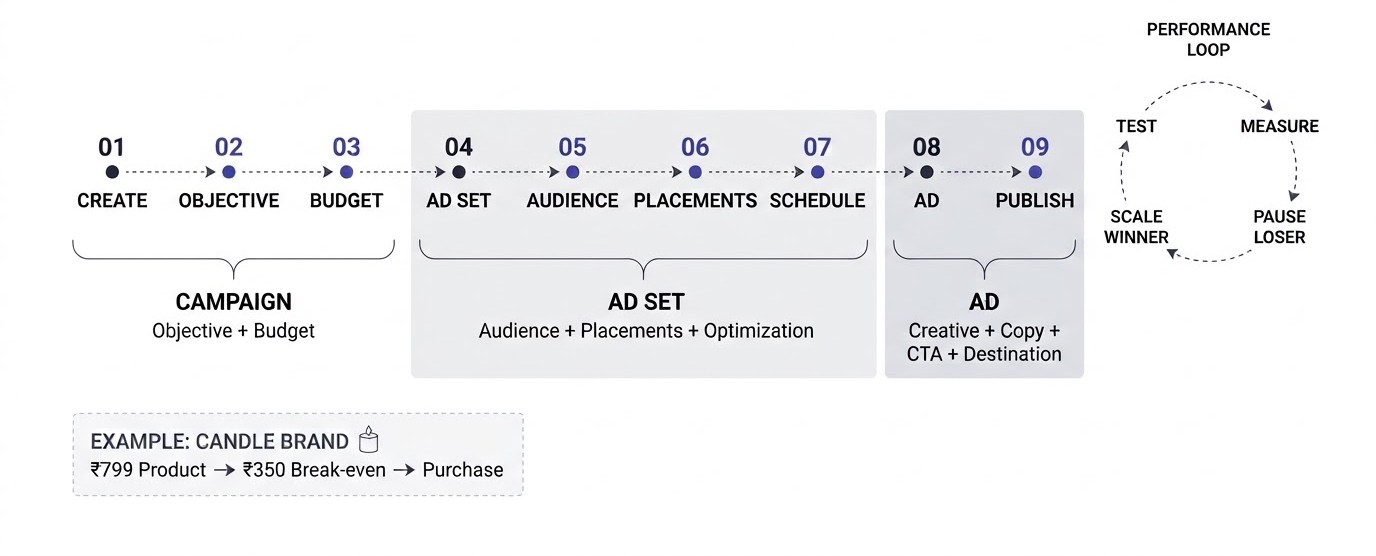
This is the main event. To create a Meta Ads campaign in Ads Manager, you open the Campaigns tab, click Create, choose an objective, set budget and audience at the ad set level, upload creative at the ad level, and publish. The nine steps below follow the real screen order, so you can keep Ads Manager open and tick them off as you go.
Step 1: Open Ads Manager and Choose the Right Campaign Objective
Go to adsmanager.facebook.com, make sure the correct ad account is selected top left, and click the green Create button. Meta shows six objectives: Awareness, Traffic, Engagement, Leads, App Promotion and Sales. This choice tells Meta’s delivery system what kind of person to hunt for, so it’s the most important click in the entire process.
Here’s how to pick. Want purchases on your website? Choose Sales. Want enquiries, form fills, calls or WhatsApp chats? Choose Leads. Want people to just know you exist in a new city? Awareness. Traffic is the trap. It finds people who click links, and people who click links aren’t always people who buy. Nine times out of ten, a beginner picking Traffic really wanted Sales or Leads.
Step 2: Name Your Campaign and Check Special Ad Categories
Give the campaign a name you’ll understand in six months. Something like “Sales | Candles | Diwali Test | Oct26” beats “New Campaign 3”. Once you’re running ten campaigns, naming is the only thing keeping you sane. Pick a pattern and stick to it: objective, product, offer, date.
Next comes the Special Ad Categories box. If you advertise credit, employment, housing, or social issues, elections and politics, you must declare it, and targeting options get limited. Declaring honestly is far cheaper than getting your account restricted for hiding it. Everyone else leaves it blank. Also decide whether to use Meta’s Advantage+ sales or leads setup, which automates more choices. For learning purposes, build the manual version first so you understand every lever.
Step 3: Set Your Budget with Advantage Campaign Budget or Ad Set Budget
Meta gives you two budget approaches. Advantage campaign budget (the thing formerly called CBO) sets one budget at campaign level and lets Meta shuffle money between ad sets toward whichever performs. Ad set budget gives each ad set its own fixed amount. Neither is universally better.
If you’re testing three audiences and want each to get a fair shot, use ad set budgets. If you’ve already found winners and want Meta to push money toward the best one, use campaign budget. Choose between a daily budget, which spends roughly that amount each day (Meta may exceed it by up to 25% on a good day and balances it out across the week), and a lifetime budget with an end date. Beginners should use daily. A good test minimum is a budget that can buy about 5 to 10 conversions per day at your expected cost, because Meta needs those events to learn.
Step 4: Configure the Ad Set with Conversion Location and Performance Goal
Now you’re at the ad set level. First comes the conversion location: where should the result happen? Options include your website, an app, Messenger, Instagram, WhatsApp or calls, depending on the objective. For a Sales campaign, pick Website and choose your pixel and the Purchase event.
The performance goal tells Meta what to optimize for. The default “Maximize number of conversions” works for most cases. Here’s a trick worth knowing: optimize for the event closest to money that happens often enough. If you only get 8 purchases a month, Meta can’t learn from that. Optimize for Add to Cart or Initiate Checkout until your volume grows. The rough target is about 50 optimization events per ad set per week to exit the learning phase. A beginner who optimizes for purchases on a ₹300 daily budget is basically asking Meta to find a needle with a flashlight and no batteries.
Step 5: Build Your Audience: Advantage+, Custom and Lookalike
Audience is where beginners overthink. Meta’s Advantage+ audience lets the algorithm find people beyond the interests you suggest, and in many accounts it now matches or beats hand-built targeting. You still give it suggestions: location, minimum age, and optional audience signals like a customer list or interests.
Custom audiences are people who already know you: website visitors, Instagram engagers, video viewers, customer email lists. Upload a list of past buyers under Audiences, then Create, then Custom Audience, then Customer List. Lookalike audiences find new people resembling those buyers. A list of 500 to 1,000 real customers produces far better lookalikes than 40 names. For cold traffic, start broad with Advantage+. For warm traffic (retargeting), use custom audiences covering the last 7, 14 or 30 days of visitors, and exclude recent purchasers so you don’t pester people who already bought.
Step 6: Choose Placements and Let Advantage+ Placements Do the Work
Placements are where your ad appears: Facebook Feed, Instagram Feed, Stories, Reels, Explore, Messenger, the Audience Network and more. Advantage+ placements (the default) lets Meta distribute your ad across all of them wherever it finds cheap results. For most beginners this is the right setting, since limiting placements shrinks the pool and raises costs.
There’s one caveat. If your creative isn’t built for every format, it can look terrible somewhere. A 1:1 square image stretched into a 9:16 Story looks lazy. So upload creatives in 4:5 and 9:16 at least, and use the placement customization tool in the ad step to adjust each. Check the Placement breakdown after a week. If Audience Network is eating 20% of spend with junk clicks, exclude it. Don’t exclude things on day one based on gut feeling.
Step 7: Set Your Schedule, Bid Strategy and Cost Controls
By default, your ad set starts immediately and runs until you stop it. For a launch campaign, schedule the start for early morning so you can watch the first hours. Meta’s first delivery pattern sets the tone, and nobody wants to discover a broken link at 2 a.m.
Bid strategy decides how Meta spends your budget. “Highest volume” gets the most results for your money with no cost cap and is the right starting point. “Cost per result goal” sets a target average and Meta tries to hit it. “Bid cap” is strict and often starves delivery. A mistake people make is setting a cost cap too low out of optimism: say you set ₹100 for a product that realistically costs ₹400 to acquire. Meta simply won’t spend. Your ad set shows “learning limited” and you assume the algorithm is broken, when you just starved it.
Step 8: Create the Ad with Creative, Copy, Call to Action and Destination
Now you’re at the ad level. Choose your Facebook Page and Instagram account as the identity. Pick a format: single image, single video, carousel or collection. Upload your media, then fill in primary text (the caption above the creative), headline, description and call to action button like Shop Now, Learn More or Send WhatsApp Message.
The destination URL should land people on the exact product or offer page, never your homepage. Add UTM parameters through the URL builder so Google Analytics can separate Meta traffic from everything else. Then click Preview and check every placement: Feed, Stories, Reels. Read your caption on a phone. If the first line gets cut off and the hook is buried behind “See more”, rewrite it. You’ll want to also tick the box for Advantage+ creative enhancements only if you’ve reviewed what they change, because auto-cropping and filters can mangle brand visuals.
Step 9: Review, Publish and Check Ad Approval
Before you hit Publish, scan the right-hand summary: objective, budget, audience size, placements and the pixel event. Wrong pixel, wrong event or wrong page is the quiet killer of week-one budgets. Check that the campaign status isn’t in draft and the schedule is correct.
Meta reviews ads automatically, usually within a few hours, though it can take up to 24 hours or more. Rejections usually come from before/after claims, personal attributes (“Are you overweight?”), misleading buttons or text that takes up too much of an image. If an ad is rejected, read the reason in Account Quality, fix it, and request a review. Don’t just duplicate the same ad again, because repeated violations can hurt the account. Then wait. Don’t touch anything for the first day beyond checking that it spends.
A Worked Example: A Candle Brand’s First Campaign
Imagine a small candle brand in Jaipur selling ₹799 soy candles on Shopify. Break-even cost per purchase is ₹350. They set up a Sales campaign, one ad set with Advantage+ audience across India (age 22+), optimizing for Purchase, daily budget ₹800. Three creatives: a 20-second Reel of the candle being poured, a customer photo carousel, and a static offer image.
After four days: the Reel shows ₹2,900 spent, 6 purchases (₹483 each), the carousel shows 2 purchases (₹600), and the static spent ₹400 with zero. They pause the static, build two new Reels in the same style as the winner, and keep the carousel. Nothing clever happened. They tested creative, watched real numbers against break-even, and cut the loser. That loop is the whole game.
How to Create a Meta Ads Campaign Creative That People Actually Stop For
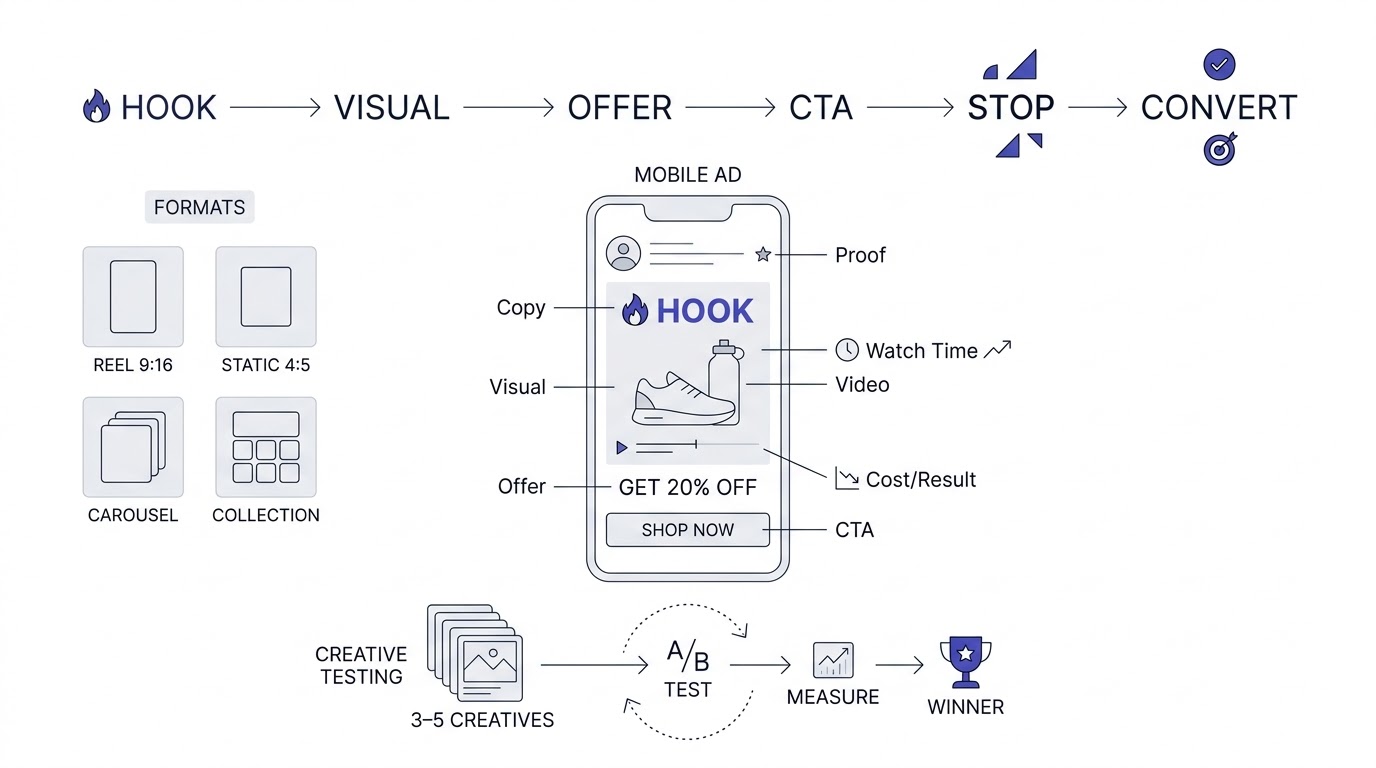
Creative is now the biggest lever when you create a Meta Ads campaign, because Meta’s algorithm handles most targeting on its own. The ad itself, meaning the first three seconds, the visual, the offer and the words, decides whether people stop or keep scrolling. Spend your effort here.
Know the Formats: Reels, Static, Carousel and Collection
Short vertical video (9:16, 15 to 30 seconds) is the workhorse for Reels and Stories and often wins on cost. Static images in 4:5 work well for strong offers and clean product shots. Carousels let you show multiple products or walk through steps. Collection ads open a full-screen mobile storefront and suit e-commerce catalogs.
There’s no universal winner, and anyone claiming one is selling something. What works is testing. Start with one video, one static, and one carousel for the same offer and see which gets cheaper results. Keep text on images minimal, because Meta no longer penalizes heavy text as strictly as before but people still skip walls of words. Make the thing readable with the sound off, since a big share of viewers scroll muted, so burn in captions on videos.
Write a Hook That Lands in the First Three Seconds
The hook is the opening line or visual moment. If it fails, nothing after it matters. Good hooks usually do one of four things: name a problem (“Your candle burns out in an hour, right?”), show a surprising result, make a bold claim you can prove, or start mid-action instead of with a logo.
A bad hook is “Introducing our new collection”. Nobody has been waiting for that. A better one: “These candles burn for 45 hours. Here’s the test.” Then show a timer. Record five different openings for the same video and test them. Often the body of the video is identical and only the hook changes, and cost per result swings by half. That’s the cheapest experiment you’ll ever run.
Craft Primary Text, Headline and Call to Action
Primary text should do three jobs in under 125 characters before “See more”: hook, relevance, and a reason to continue. After that you can expand on benefits, proof and the offer. A reliable structure is problem, then solution, then proof, then offer, then action. Real proof beats adjectives. “4.8 stars from 1,200 buyers” does more than “amazing quality”.
Headlines should be short and specific: “Flat 20% Off Till Sunday” works better than “Our Best Collection”. Pick the call to action button that matches intent. Shop Now for e-commerce, Learn More for lead nurturing, Send Message for WhatsApp enquiries. Keep claims you can back up. Exaggeration doesn’t only violate policy, it creates refunds and angry comments that sit right under your ad for everyone to see.
Design Visuals That Work Without a Big Budget
You don’t need a studio. Phone footage in daylight near a window looks real and often outperforms polished studio shots because it feels like content rather than advertising. Use Canva’s Brand Kit to lock two main colors and one accent, plus one font, so ads look consistent. If visual hierarchy still confuses you, the graphic design learning hub explains the basics in beginner terms.
Add customer photos, unboxing clips and screenshots of real reviews. User-generated content, meaning content from actual customers, tends to feel trustworthy and cheap to produce. Ask ten customers for a short video in exchange for a discount. Even three usable clips will give you more ad material than a week of brainstorming. Keep your logo small and out of the first second. Nobody stopped scrolling for a logo.
Test Creatives Properly Without Wasting Budget
Test one variable at a time. If you change the hook, the visual and the offer all at once, you won’t know which one did the work. Run 3 to 5 creatives in one ad set and let Meta spread spend, then look at cost per result and watch time after 3 to 5 days, not 3 hours.
Give each creative a fair chance, roughly enough spend to buy 1 to 2 times your break-even cost before judging it. If an ad spent ₹350 and got nothing, that’s too early to call it dead. If it spent ₹1,500 against a ₹350 break-even and still nothing, it’s a goner. Keep a simple spreadsheet noting hook, format, spend, results and what you learned. In three months that sheet is worth more than any guide, including this one.
How to Create a Meta Ads Campaign Structure That Scales
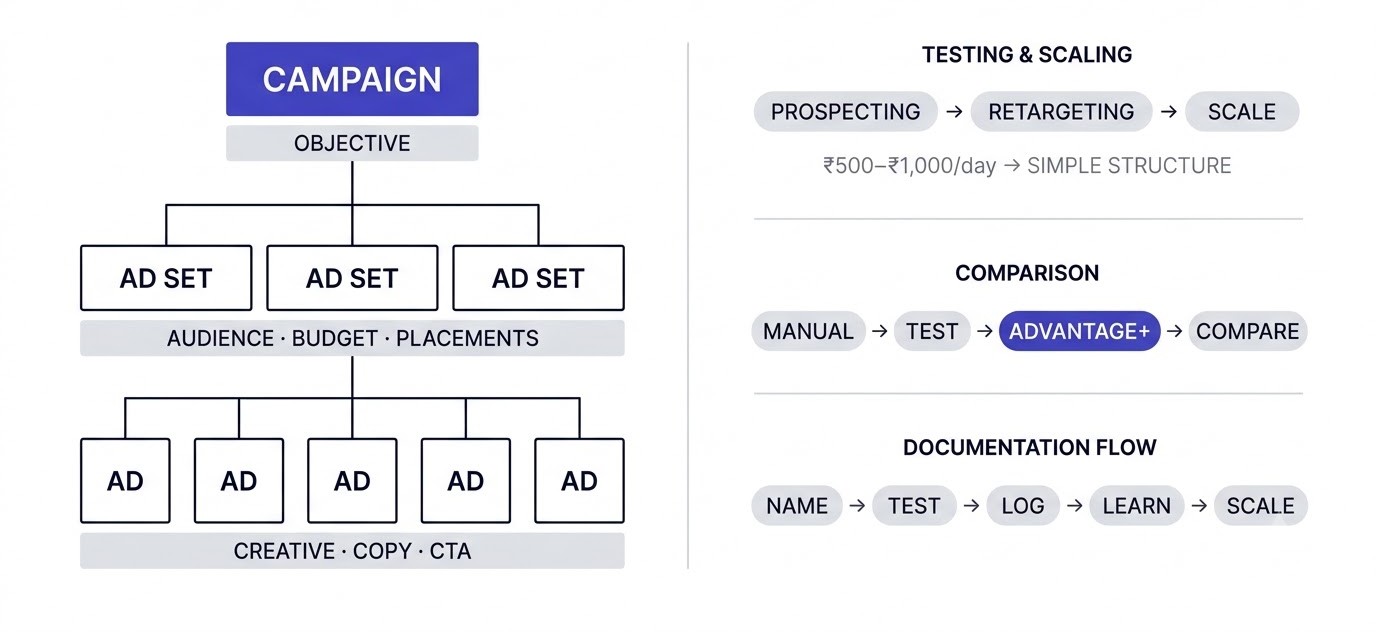
Once you know the steps, the next question is how many campaigns and ad sets to run. A good structure for beginners is one campaign per objective, two to three ad sets per campaign, and three to five ads per ad set. Simple structures learn faster, cost less and are easier to fix. Complexity is usually a sign of fear, not strategy.
Understand the Campaign, Ad Set and Ad Hierarchy
Meta organizes everything in three layers. The campaign holds the objective. The ad set holds the audience, budget, schedule, placements and optimization event. The ad holds the creative and copy. When something breaks, knowing which layer owns the problem saves hours.
Poor results with good clicks? Check the landing page and pixel, not the ad. High cost per click and low reach? That’s often creative or audience. Spend not happening? Look at budget, bid and ad approval at the ad set level. Think of it like a restaurant: campaign is the cuisine, ad set is which customers you invite, ad is the menu you hand them. You can’t fix a bad menu by inviting different customers.
Build a Simple Testing Structure for Small Budgets
With ₹500 to ₹1,000 a day, resist building ten ad sets. Each one needs its own data to exit the learning phase, and a small budget spread across ten leaves everyone starving. Run one campaign, one or two ad sets, and rotate creatives inside them.
A clean beginner setup: Campaign A is prospecting (cold audience, Advantage+), with one ad set and four creatives. Campaign B is retargeting (website visitors from the last 14 days, excluding buyers) with a smaller budget of 20% to 30% of the total. Retargeting audiences are small, so don’t expect them to spend as much. This two-campaign structure covers most small businesses for months. Add more only when winners are clear and budget allows.
Use Advantage+ Campaigns Versus Manual Campaigns
Advantage+ sales and leads campaigns automate audience, placements and budget allocation, leaving creative as your main input. They often perform very well, especially with a healthy pixel and solid creative. Manual campaigns give more control and show you more about what’s working.
A sensible approach: begin with manual so you learn how each setting behaves, then test an Advantage+ campaign beside it with the same creatives and compare cost per result over two weeks. Don’t switch everything overnight because someone on YouTube said manual is dead. Run your own test. Your product, price and audience are different from theirs, and the numbers in your account are the only ones that count.
Name, Organize and Document Everything
Naming conventions sound boring until you’re staring at 40 ad sets called “Copy of Copy of New Sales Ad Set”. Use a pattern: Objective, Audience, Placement, Date. Use the same pattern for creatives: “Reel_Hook3_UGC_Oct26”.
Also keep a launch log. For each change you make, note the date, what you changed and why. When performance drops on a Thursday, you can look back and see you doubled the budget on Wednesday. Without a log, you’ll blame the algorithm. With one, you’ll often find the culprit is you. Meta’s Account History shows changes too, under the Activity tab in Ads Manager, but a personal note with your reasoning is far more useful.
After You Launch: Measure, Optimize and Scale Your Meta Ads Campaign
Creating the campaign is half the job. After launch, how you read the numbers and when you act on them decides whether your Meta ads campaign becomes profitable or just expensive. The golden rule: patience first, then decisive cuts, then careful scaling.
Respect the Learning Phase
When you launch an ad set, Meta enters the learning phase, where delivery is unstable while the system figures out who responds. It usually needs around 50 optimization events within 7 days to stabilize. During this time, costs bounce. That’s normal.
The most common beginner mistake is editing during learning: changing budget by big amounts, swapping audiences, replacing ads. Significant edits reset learning, and you pay the learning tax again. Make changes in batches and leave at least 3 to 4 days between them. If you see “Learning limited” in the delivery column, it means the ad set isn’t getting enough events. Fix it by widening the audience, raising budget, or optimizing for an earlier funnel event.
Read the Metrics That Actually Matter
Meta gives dozens of columns. For a Sales campaign, focus on a few: spend, purchases, cost per purchase, ROAS (return on ad spend, meaning revenue divided by spend), CTR (click-through rate), CPM (cost per 1,000 impressions) and frequency (average times a person saw your ad).
Customize your columns under Columns, then Customize Columns, and save a preset. Here’s how to read them together. High CPM with low CTR means the creative is weak or the audience is too narrow. Good CTR with no sales points to the landing page or offer. Frequency above 3 to 4 on a cold audience warns of fatigue. And never judge from likes or reach alone. A post with 2,000 likes and zero sales is a hobby, not an ad campaign.
Decide What to Pause, Keep and Change
After a test period of 4 to 7 days with enough spend, sort ads by cost per result against your break-even. Pause clear losers. Keep winners untouched. For middling ones, give them a little longer or change one element like the hook.
Don’t kill something on a single bad day. Meta results fluctuate, and a day-three dip often recovers by day five. Use a 7-day window for decisions. A good rule: if an ad has spent 2 to 3 times your break-even cost and produced nothing, cut it. If it’s hovering near break-even, keep it and iterate on it. Add new creatives constantly, one or two a week, since even winners tire out. Fresh creative is the cheapest way to extend a campaign’s life.
Scale Budgets Without Breaking Performance
Once you find a profitable ad set, you’ll want to pour money in. Slow down. A common safe method is raising budgets by about 20% every 2 to 3 days. Huge jumps, like doubling overnight, often shake the delivery system and costs spike.
Another method is duplicating the winning ad set into a fresh one with a higher budget, leaving the original running. You can also scale horizontally by adding new audiences, new creatives or new placements, or by expanding to other cities. Watch frequency and cost per result as you scale. If cost per purchase climbs 30% or more while volume rises, hold the budget and refresh creative before pushing further. Scaling is mostly about feeding the machine new ads, not just more money.
Troubleshoot Common Problems: No Spend, High Costs, No Sales
Not spending? Check ad approval, payment status, a too-low bid cap, an audience that’s too small, or a start time in the future. High costs? Look at creative fatigue, narrow targeting, seasonality (CPMs often jump in the Diwali and Black Friday periods) and landing page speed.
Clicks but no sales? Open your own site on a phone. Does the page load in under 3 seconds? Does the price show? Is checkout easy? Then check the pixel for double-firing or missing events. And be honest about the offer. If competitors sell something similar for ₹500 less, no ad copy will fix that. Sometimes the campaign isn’t broken. The product page is.
Mistakes People Make When They Create a Meta Ads Campaign
Almost every failed first campaign shares the same short list of mistakes. Most are cheap to avoid once you know them. Go through these before you launch and again when results disappoint.
Choosing the Wrong Objective or Optimization Event
Picking Traffic when you want sales is mistake number one. Meta delivers exactly what you ask for, which is clicks, and it’ll find the habitual clickers, not the buyers. Similarly, optimizing for Purchase with too little volume leaves the system guessing.
Match objective to goal, and optimize for the deepest event that still gets about 50 events a week. If your cost per lead looks great but the leads never answer calls, your optimization event is too shallow. Consider adding a qualifying question to your lead form or optimizing for a later event like “Qualified lead” through the Conversions API. Cheap and junk are different things.
Over-Targeting and Cutting Audiences Too Small
Stacking five interests, two behaviors, an age band of 27 to 31 and a single city leaves Meta almost nobody to show your ad to. The result is high CPM, slow delivery and frequent repeats.
Give the algorithm room. Broad targeting plus strong creative often beats narrow targeting plus average creative. If you’re local, like a gym in Bhubaneswar, a radius of 10 to 15 km is fine, but don’t also restrict by narrow interests. Use your audience size indicator as a rough guide, not a rule, and let the data show you who actually buys. Sometimes the buyers surprise you, and they’re rarely the group you assumed.
Ignoring Tracking, Landing Pages and Offers
Plenty of “bad ad” problems are broken tracking. If the pixel doesn’t fire, Meta can’t optimize, and your reports lie. Test events with Pixel Helper and the Test Events tool in Events Manager before launching.
Landing pages kill results quietly. Slow load times, confusing layouts, no mobile optimization and hidden shipping costs push buyers away. And a weak offer can’t be rescued by clever ads. A discount, free shipping, a bundle or a risk-free guarantee changes conversion more than another round of caption edits. Fix the funnel behind the ad before blaming the ad, since a leaky bucket doesn’t care how fast you pour.
Changing Things Too Often and Judging Too Early
Checking results every two hours and tweaking constantly is the habit that hurts most. Each significant change restarts learning, and early numbers are noisy. Someone sees ₹1,200 spent, zero sales, and kills the ad a day before it would have worked.
Set rules for yourself. Don’t edit in the first 48 hours unless something is clearly broken. Judge on at least 3 to 7 days of data. Make one change at a time and note it. Patience feels like doing nothing, but it’s actually the discipline that separates people who learn from their ads from people who just keep paying for them.
Conclusion
To create a Meta Ads campaign that earns its keep, get the foundations right (accounts, pixel, break-even number), pick an objective that matches the real goal, keep the structure small, and put most of your effort into creative. Then be patient enough to let data arrive before you decide anything. None of that is complicated, it’s just rarely done together.
Launch one small campaign this week with a budget you can afford to lose and three different creatives. Write down your break-even cost first and check results after five days. If you want a structured path through paid ads, funnels and analytics beyond a single guide, the Alpha Marketer Foundation Program covers the full digital marketing stack, and the Tools hub has free helpers for planning and tracking along the way.
Frequently Asked Questions
What is a Meta Ads campaign?
A Meta Ads campaign is a paid promotion set up in Meta Ads Manager that shows your ads across Facebook, Instagram, Messenger, WhatsApp and the Audience Network. It’s built from three layers: the campaign (objective), the ad set (audience, budget, placements) and the ad (creative and copy). You choose a goal, such as sales or leads, and Meta’s system shows your ads to people most likely to take that action.
How much does it cost to run a Meta Ads campaign?
There’s no fixed cost. You set your own daily or lifetime budget and pay based on delivery, usually per impression or per click, depending on the setup. Small businesses in India commonly test with ₹300 to ₹1,000 per day. What it costs to get a customer depends on your product, price, creative and competition, so work backwards from your break-even cost per sale.
Which campaign objective should a beginner choose?
Choose the objective matching your actual business result. Use Sales for purchases on a website or app, Leads for form fills, calls or WhatsApp enquiries, and Awareness for reach in a new market. Beginners often pick Traffic or Engagement because they sound easy, but those objectives find clickers and likers, not necessarily buyers. When in doubt, pick the one closest to revenue.
How long does it take for a Meta Ads campaign to start working?
Ads usually start delivering within a few hours of approval, but stable performance takes longer. Meta’s learning phase typically needs around 50 optimization events in about 7 days. Plan on 4 to 7 days before judging results, and avoid heavy edits during that time. Some campaigns take two to three weeks of creative testing before finding a winning combination.
What is the Meta Pixel and do I need it?
The Meta Pixel is a snippet of code on your website that records visitor actions like page views, add to cart and purchases and sends them back to Meta. You need it if you want to optimize for website results, track conversions or build retargeting audiences. Pairing it with the Conversions API improves accuracy, especially when browsers or devices block pixel tracking.
What is the difference between boosting a post and creating a campaign in Ads Manager?
Boosting is a simplified shortcut inside Instagram or Facebook that promotes an existing post with limited options. Creating a campaign in Ads Manager gives full control over objective, audience, placements, budget, bidding and tracking. Boosting suits quick engagement or awareness. For sales, leads or serious testing, Ads Manager is the better tool because you can optimize for real conversions.
Is Advantage+ better than manual targeting?
Advantage+ often performs as well as or better than manual targeting, especially with a healthy pixel and strong creative, because Meta’s system finds buyers beyond your guesses. Manual setups give more control and clearer learning. A smart approach is to run both with the same creatives for a couple of weeks and compare cost per result in your own account.
How many ads should I run in one ad set?
For small budgets, three to five ads per ad set is a good range. It gives Meta enough variety to find a winner without splitting spend into tiny pieces. Test one variable at a time, such as the hook or format, and replace losers with new variations. Too many ads at once dilute your data and slow down learning.
Why is my Meta ad not spending?
Common reasons include a pending or rejected ad, payment method problems, a start date in the future, a very small audience, or a bid cap or cost cap set too low for the market. Check the delivery status in Ads Manager and Account Quality for policy issues. If everything looks fine, raise the budget or switch to the highest volume bid strategy.
What is a good ROAS for Meta ads?
It depends on your margins. ROAS is revenue divided by ad spend, and the break-even ROAS equals one divided by your profit margin before ad cost. If your margin is 40%, break-even ROAS is 2.5. Anything above that is profit on the first order. Businesses with strong repeat purchases can accept lower ROAS on the first sale.
How often should I change my ad creative?
Refresh creative when performance dips, which for many accounts means every 2 to 4 weeks, depending on spend and audience size. Watch frequency and CTR: when frequency climbs above 3 to 4 on cold audiences and CTR drops, the ad is tiring out. Add one or two new creatives per week as a habit rather than waiting for a crash.
Can I run Meta ads without a website?
Yes. You can send people to Instagram profiles, Messenger, WhatsApp or instant forms inside Facebook and Instagram. Lead campaigns with instant forms and click-to-WhatsApp ads work well for local services, coaching classes and clinics. A website helps with tracking, credibility and retargeting, so build one when you can, but it isn’t required to start.
How do I avoid getting my Meta ad account banned?
Follow Meta’s advertising standards. Avoid misleading claims, before and after images for health products, personal attribute targeting in copy, and fake buttons. Keep your payment method valid, verify your business and domain, declare special ad categories honestly, and respond to policy notices promptly. Don’t create duplicate accounts after a restriction, since that usually makes things worse.