

Picture a home baker in Bhubaneswar. She posts cake photos on Instagram every day, gets 40 likes, and sells maybe two cakes a week to people she already knows. Then she spends ₹500 on a “Boost Post” button, watches the money vanish, and gets nothing but a few likes from strangers who will never order anything. She decides ads don’t work. Honestly, that story plays out thousands of times a day, and it is almost never the platform’s fault.
Meta Ads for Beginners is really about one thing: understanding the machine before you feed it money. Facebook advertising is an auction system that shows your ad to the people most likely to do what you want, as long as you tell it clearly what you want and give it something worth clicking. Get those two things right and ₹500 a day can bring in real customers. Get them wrong and the same ₹500 disappears by lunch.
This guide walks through the whole thing in plain language. You will see how the ad auction picks winners, how to set up your accounts without the usual headaches, how campaigns are built, how targeting works now that Meta has automated so much of it, and how much you should actually spend. By the end you will know enough to launch a first campaign without guessing, and enough to spot why a campaign is failing instead of just throwing more money at it.
What You Will Learn in This Guide
- What Meta Ads are, where they appear, and how they differ from “boosting” a post
- How the ad auction decides who sees your ad and what you pay
- How to set up your Page, ad account, payment method and Meta Pixel properly
- How campaigns, ad sets and ads fit together, and which objective to pick
- How audience targeting works, including Custom Audiences, Lookalikes and Advantage+
- How to set a first budget that makes sense for a small business in India
- How to build ad creative and copy that people stop scrolling for
- A step-by-step walkthrough of launching your first campaign
- How to read your numbers and fix the mistakes that burn beginner budgets
TL;DR
- Meta Ads run on an auction where your ad competes on bid, expected action rate and ad quality, not just money.
- Pick the objective that matches the action you want, because Meta optimizes for exactly that and nothing else.
- Install the Meta Pixel before spending anything, or the system has nothing to learn from.
- Start with one campaign, two or three ad sets and a few different creatives, then let the data decide.
- A daily budget of ₹500 or more gives a beginner enough room to learn within a week or two.
- Judge ads by cost per result and return on ad spend, not by likes or reach.
What Are Meta Ads? Meta Ads for Beginners Starts Here
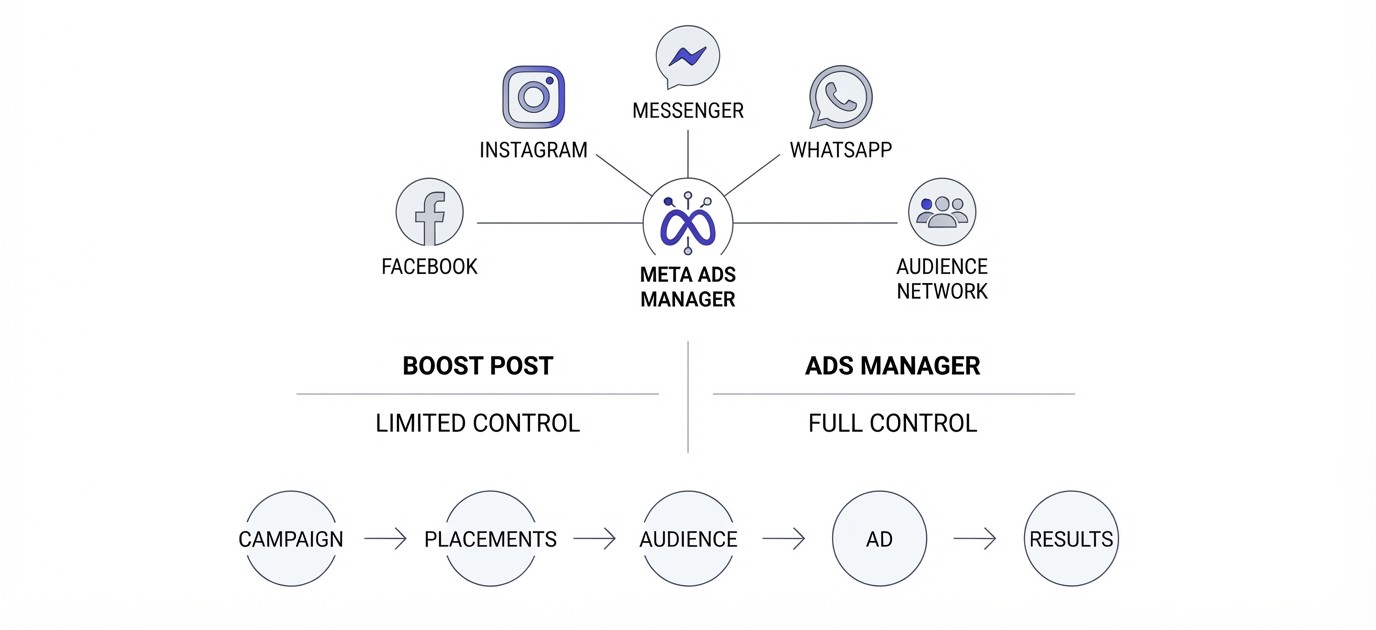
Meta Ads are paid placements that show up across Facebook, Instagram, Messenger and WhatsApp-linked experiences, all managed through one system called Meta Ads Manager. If you have ever scrolled past a sponsored Reel or a “Shop now” story, you have seen them. This section clears up the naming confusion and explains what you are really buying.
Meta Ads vs Facebook Ads: What Is the Difference?
Facebook Ads and Meta Ads are the same thing now. The company behind Facebook changed its name to Meta in 2021, and the ad platform came along with it. People still search for “Facebook advertising” because that is the name they grew up with, but the tool you log into is Meta Ads Manager, and one campaign can run on Facebook, Instagram and more at the same time.
That matters because beginners often think they need separate setups for Instagram and Facebook. Nope. One ad account, one campaign, and you simply choose where the ads appear. Meta calls those choices placements, and we will get to them properly later.
Where Your Ads Actually Show Up
Your ad can appear in the Facebook feed, Facebook Stories, Facebook Reels, the Instagram feed, Instagram Stories, Instagram Reels, Instagram Explore, Messenger inbox and Stories, and Meta’s Audience Network, which pushes ads into third-party apps. That is a lot of surface area for one budget.
Here is the catch. Each place behaves differently. A vertical video that looks great in Reels can look cropped and awkward in the Facebook feed. Seeing where your ad lands, and judging whether it fits, is one of the first habits worth building.
Boost Post vs Ads Manager
The blue Boost button under your post is a simplified shortcut. It gives you a few choices, like audience and budget, and hides almost everything else. You cannot pick a proper objective, split test audiences or install tracking. Boosting is fine if you want a post to reach more of your local followers, but it is a poor way to get leads or sales.
Ads Manager gives you the full controls. It looks scary on day one, with all its columns and toggles, but that control is exactly what lets you tell Meta to chase purchases instead of likes. If a business wants customers rather than applause, Ads Manager is where the work happens.
What Meta Ads Can and Cannot Do
Meta Ads are great at finding people who don’t know you exist yet. A bakery in Cuttack, a coaching class in Pune, a skincare brand in Delhi: all of them can reach strangers who fit a profile and haven’t searched for anything. That is the big difference from Google Search, where people are already looking.
What ads cannot do is fix a weak offer. If your price is too high, your page looks sketchy or your product photos are blurry, ads will just show that problem to more people faster. If you want the wider picture of how paid channels fit together, the digital marketing basics hub covers it without the jargon.
How Facebook Advertising Works Behind the Scenes
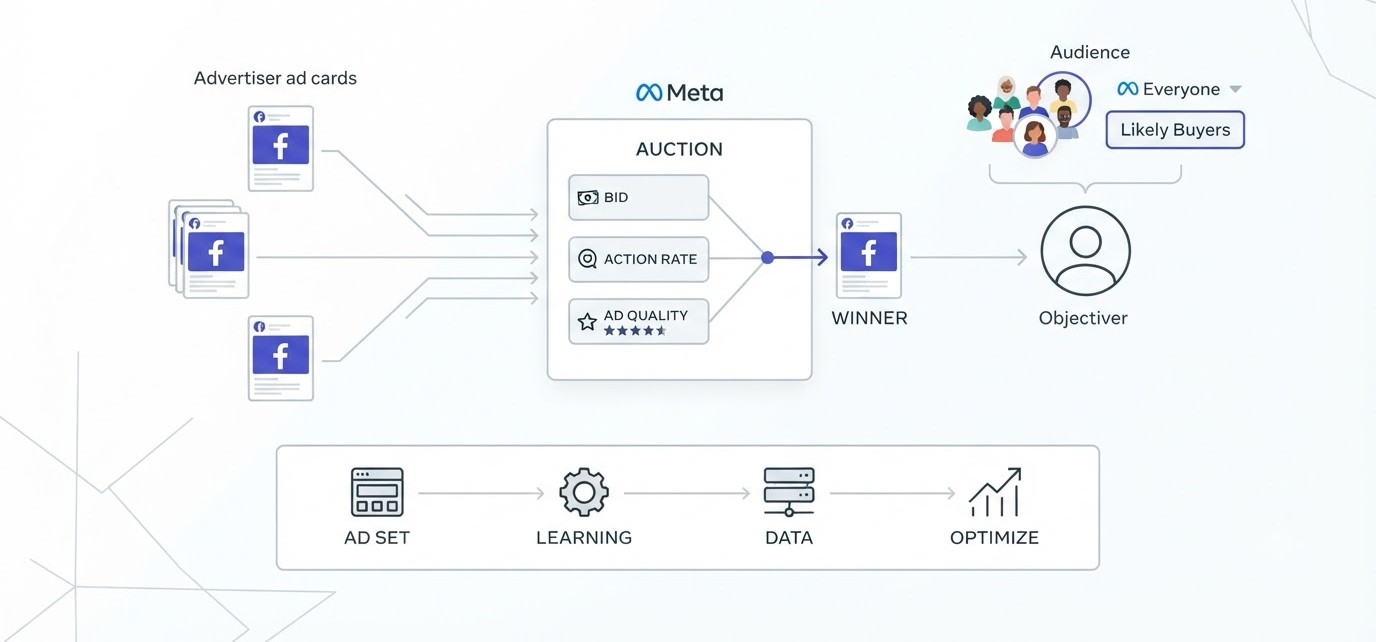
Facebook advertising works through a live auction that runs every time someone opens the app and has a spot for an ad. Meta compares every eligible advertiser in milliseconds and shows the winner. Understanding this is what separates people who burn money from people who get steady results.
The Ad Auction in Plain English
Every time a person scrolls, Meta checks which ads could be shown to them and runs a quick auction. There is no fixed price for a spot. Your ad competes against every other advertiser targeting that same person at that same moment, which is why costs jump during Diwali sales and drop in quiet weeks.
The winner is not simply the highest bidder. Meta picks the ad with the best “total value,” which mixes three things: your bid, how likely this specific person is to take the action you want, and how good the ad experience is. A cheap bid with a great ad can beat a big bid with a boring one.
The Three Parts of Total Value
First, your bid or budget tells Meta how much the action is worth to you. Second, the estimated action rate is Meta’s guess about whether this person will click, buy or sign up, based on their past behavior. Third, ad quality covers things like whether people hide your ad, report it, or hit a landing page that loads slowly and feels spammy.
You only control the first and third directly. The second part improves as your pixel collects data. That is why beginners with tracking installed tend to see costs fall after a couple of weeks, while beginners without it stay stuck.
Why the Learning Phase Matters
Every new ad set starts in what Meta calls the learning phase. During this time, the system is testing who responds, and results swing wildly. To exit it, an ad set generally needs around 50 optimization events, like purchases or leads, within a seven-day window.
Do the math on a small budget. If your daily spend is ₹300 and a lead costs ₹150, you get two leads a day, or about 14 a week. That is nowhere near 50, so the ad set sits in “Learning Limited.” The fix is usually to optimize for an event that happens more often, or to raise the budget, or to narrow down to fewer ad sets so the budget isn’t spread thin.
Why Meta Shows Your Ad to Some People and Not Others
Meta is not showing your ad to everyone in your target audience. It is showing it to the people inside that audience who it predicts will act. If you choose “Sales” as your objective, the system hunts for likely buyers. If you choose “Engagement,” it hunts for people who like and comment, who are often not buyers at all.
That single idea explains why so many beginners get cheap likes and no revenue. Meta did exactly what it was told to do. Pick the objective carefully, because that choice steers everything the algorithm does afterwards.
Setting Up Your Account: A Meta Ads for Beginners Checklist
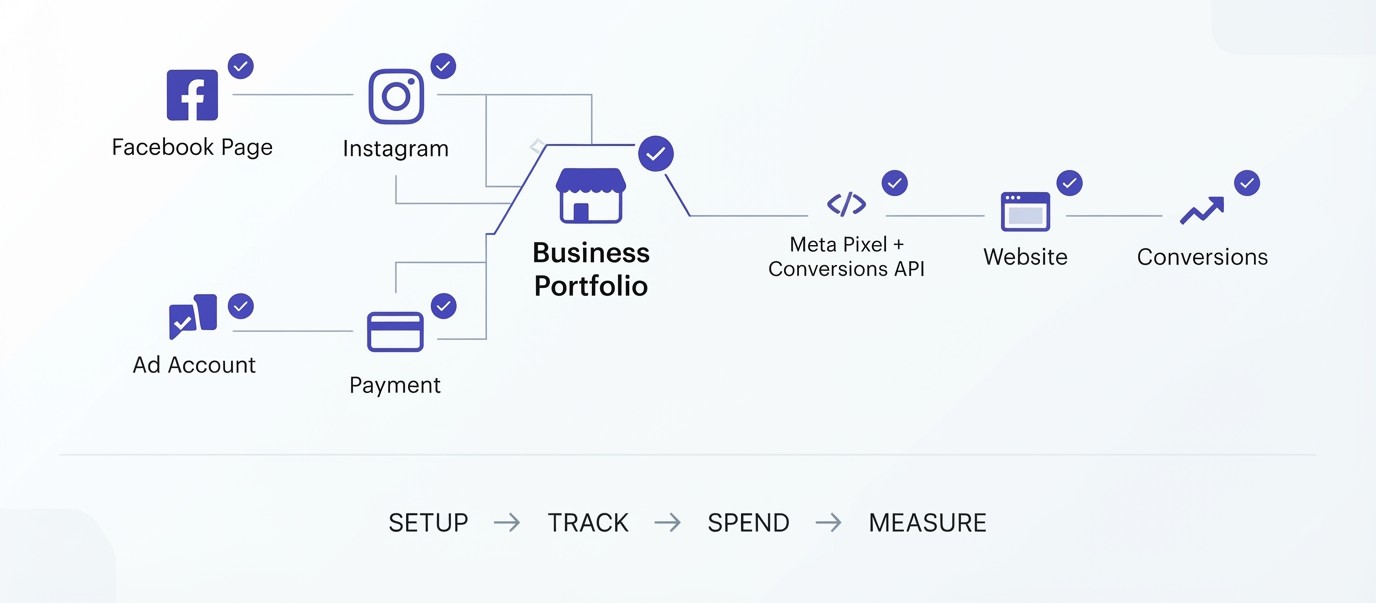
Before spending a rupee, you need four things in place: a Facebook Page, a connected business account, a payment method and tracking. Most beginner disasters, like ad accounts getting restricted, come from skipping or rushing this stage. It takes an hour or two and saves weeks of trouble.
Create a Facebook Page and Connect Instagram
Your ads need a Facebook Page to run from, even if you only care about Instagram. The Page is the identity attached to the ad: name, logo, and profile. Use your real business name, upload a clean logo, and fill out the About section with a real address or contact number so it doesn’t look like a throwaway.
Then connect your Instagram professional account to that Page from the Page settings. If Instagram isn’t connected, Meta will run your Instagram ads under the Page’s name, which looks odd and loses you the profile clicks. A properly linked profile also lets people check your posts before buying, and they do check.
Set Up a Business Portfolio and Ad Account
Go to business.facebook.com and create a business portfolio (it used to be called Business Manager). Inside, you add your Page, your Instagram account and an ad account. This setup keeps everything in one place, so you control access instead of depending on a personal profile.
Add your own personal profile as an admin, and nobody else with full control unless you trust them completely. Plenty of small business owners have lost access to a Page because a freelancer or ex-employee owned the only admin account. Back up your own login with two-factor authentication on day one.
Add a Payment Method and Set Spending Limits
Under Billing in your ad account, add a debit card, credit card or UPI where available, depending on what Meta supports for your account. Meta charges you after your ads run, either when you hit a billing threshold or on a monthly date, so you are spending before you pay.
Set an account spending limit if you are nervous. Beginners sometimes leave a campaign running over a weekend and wake up to a bigger bill than planned. A spending limit, plus a sensible daily budget at the campaign level, keeps the downside small while you learn.
Install the Meta Pixel and Conversions API
The Meta Pixel is a small snippet of code on your website that records what visitors do: view a product, add to cart, buy, fill a form. Without it, Meta has no idea who converted, so it cannot learn who to target next. You create it in Events Manager and install it on your site, or connect it through Shopify, WordPress plugins or Google Tag Manager.
The Conversions API sends the same events from your server straight to Meta, which helps when browsers or privacy settings block the pixel. Since Apple’s tracking changes in 2021, browser-only tracking misses a chunk of conversions. If your site is on Shopify or WooCommerce, the built-in Meta integration usually sets both up for you. If you are working with custom sites, the web development learning hub has the technical side covered.
Campaign Structure Explained: Campaigns, Ad Sets and Ads
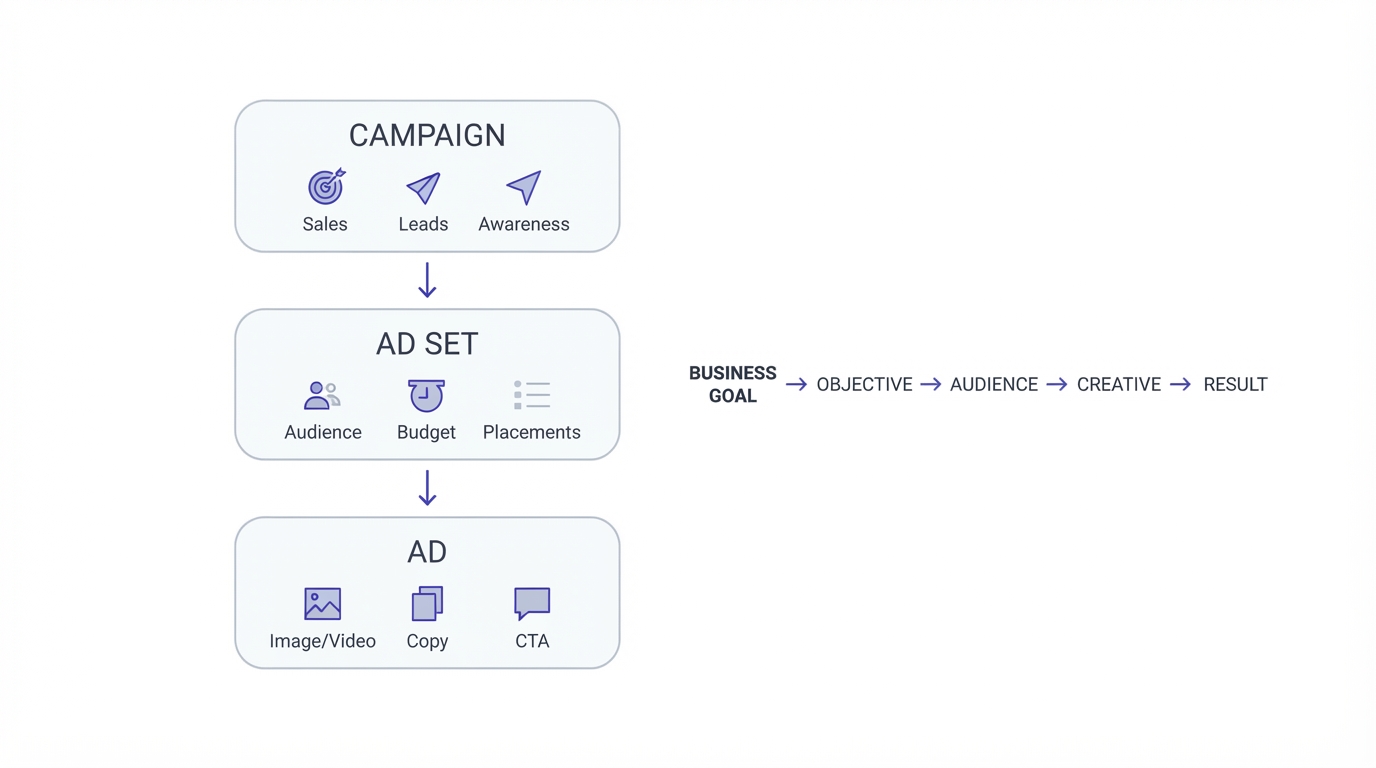
Every Meta setup follows the same three-layer structure: campaign on top, ad sets in the middle, ads at the bottom. Beginners often mix these up, which leads to messy accounts where nobody can tell what worked. Knowing what each layer controls makes everything else easier to read and fix.
The Campaign Level: Choosing Your Objective
The campaign is where you pick your objective, which tells Meta what result you want. Right now the options are Awareness, Traffic, Engagement, Leads, App Promotion and Sales. Each one changes how the system finds people.
Choose Sales if you run an online store and want purchases. Choose Leads if you want form fills or WhatsApp enquiries. Choose Traffic only if you truly want website visits, since Meta will then chase cheap clickers, not buyers. Start from the end result you want and work backward, not from whichever option looks easiest.
The Ad Set Level: Audience, Budget and Placements
The ad set is where you decide who sees your ads, where they appear, how much you spend and when. This is the layer you will fiddle with most. One campaign can hold several ad sets, each testing a different audience or budget.
A good beginner setup is two or three ad sets with clearly different audiences, like one broad audience and one interest-based audience. Don’t build ten ad sets on day one. You will split your budget so thin that none of them gather enough data to learn anything.
The Ad Level: Creative, Copy and Destination
The ad itself is the actual image or video, the headline, the text, and the button people tap. This is the layer your audience sees, and honestly it is where most of your results are decided. Strong creative can rescue average targeting, but perfect targeting rarely rescues bad creative.
Put three to five different ads inside each ad set when you launch. Let Meta shift the budget toward whichever one wins. Change one thing at a time, like the hook line or the first image, so you can tell what caused the difference.
Matching Objectives to Real Business Goals
A local gym wants walk-ins, so Leads with an instant form or a click-to-WhatsApp ad fits. A clothing brand wants purchases, so Sales with the pixel firing on checkout. A new coaching business wanting name recognition could start with Awareness, but should move to Leads fast, because awareness alone doesn’t pay the rent.
One more thing: Meta now pushes Advantage+ campaign options that automate a lot of the setup, especially for e-commerce. They can work well, but you still need to understand the structure underneath, otherwise you can’t diagnose anything when results dip.
Targeting Your Audience in Meta Ads for Beginners
Targeting is how you tell Meta who should see your ads. It used to be the main skill in Facebook advertising, with people stacking dozens of interests. Now Meta’s system does a lot of the finding on its own, so the job has shifted toward giving it good signals instead of narrow instructions.
Core Audiences: Location, Age, Gender and Interests
Core audiences are the classic option. You pick a location (a city, a radius around a pin, a whole state), an age range, gender if relevant, and detailed targeting like interests, behaviors or demographics. A Pune-based yoga studio might choose a 10 km radius, women aged 25 to 45, with interests in yoga and wellness.
The mistake is going too narrow. An audience of 40,000 people sounds precise, but it can get expensive fast because the same people see your ad again and again. For most local businesses in India, an audience in the range of several hundred thousand to a few million gives the algorithm enough room to find buyers.
Custom Audiences: Retargeting People Who Already Know You
Custom Audiences let you show ads to people who already interacted with you. You can build them from website visitors (through the pixel), Instagram or Facebook engagers, video viewers, or a customer list you upload, like email addresses or phone numbers from past orders.
These tend to be your cheapest and best-converting audiences, because the person already knows you. Someone who added a product to cart yesterday and forgot to pay is much easier to convert than a stranger. Even a small retargeting ad set with ₹100 a day often pays for itself.
Lookalike Audiences: Finding More People Like Your Best Customers
A Lookalike Audience takes a source group, like your past buyers, and finds new people in the same country who resemble them. Meta needs a source of at least 100 people from one country, though bigger and cleaner sources work much better.
You pick a size from 1% to 10% of the country’s population, where 1% is the closest match. Start with 1% or 2%. The quality of the source matters more than anything else here, so a list of actual paying customers will beat a list of everyone who ever liked your page.
Advantage+ Audience and Broad Targeting
Advantage+ audience lets Meta expand beyond your suggestions if it finds better-performing people. Broad targeting, where you only set location and a loose age range, has become surprisingly effective for many advertisers, especially when the pixel has plenty of purchase data behind it.
Does that mean interests are dead? No. For brand new accounts with no data, interests still give the system a starting point. The practical approach is to test one interest-based ad set against one broad ad set and let the numbers pick the winner after a week or so.
Budgets, Bidding and Costs in Meta Ads for Beginners
Budget is the question everyone asks first and understands last. There is no magic number, but there are sensible starting points based on how Meta’s learning works. This section covers how to set budgets, what costs to expect in India, and how to scale without breaking things.
Daily Budget vs Lifetime Budget
A daily budget is the average amount Meta spends each day, though it can spend up to about 25% more on a good day and less on a slow one. A lifetime budget is a total for the whole campaign period, which Meta spreads however it sees fit across those days.
Beginners should use daily budgets. They are easier to understand and easier to pause or adjust. Lifetime budgets suit planned events, like a three-day sale, where you know the exact dates and want Meta to pace itself within the window.
How Much Should a Beginner Spend?
Here is the honest answer: enough to get data. In India, a realistic starting point is ₹500 to ₹1,000 per day per campaign for a couple of weeks. Anything much lower, like ₹100 a day, makes it very hard to collect enough results to learn from.
Run the numbers first. If a purchase is worth ₹800 to you and you can afford to spend ₹250 to get one, then 50 purchases a week would cost ₹12,500 a week, about ₹1,800 a day. If that is too much, optimize for something earlier, like add to cart, so you reach enough events on a smaller budget.
Understanding CPM, CPC, CTR and CPA
CPM is the cost per 1,000 impressions, and in India it often falls somewhere between ₹60 and ₹250 depending on audience and season. These are rough numbers, so your account will differ. CPC is cost per click, CTR is the percentage of people who click after seeing the ad, and CPA is cost per acquisition, meaning what one lead or sale costs you.
Of those, CPA and return on ad spend matter most because they connect to profit. A low CPC feels great, but if those clicks never buy, you are paying for tourists. Always follow the money back to the actual outcome.
Scaling Without Wrecking Performance
When a campaign works, the temptation is to triple the budget overnight. That usually resets learning and costs spike. A common rule of thumb among advertisers is to raise the budget by about 20% every few days instead of in big jumps.
Another way to scale is to duplicate a winning ad set with a fresh audience or new creative, rather than pushing the same one harder. Frequency is the warning light here: if the same person has seen your ad more than three or four times on a cold audience, the creative is tired and needs replacing.
Creating Ads That People Actually Stop Scrolling For
Creative is where ad accounts are won and lost. The system can find the right people, but if your ad doesn’t earn a second of attention, nothing else matters. This section looks at formats, hooks, copywriting and how to test ideas without wasting weeks.
Choosing the Right Ad Format
Single image ads are easiest to make and good for simple offers. Carousel ads show several cards people can swipe, which suits catalogs and step-by-step stories. Video ads, especially short Reels-style clips, tend to grab attention best because motion stops thumbs. Collection and catalog ads work for online stores with lots of products.
For sizing, 4:5 works well in feeds and 9:16 vertical is the standard for Stories and Reels. Design for the placement you care about most, then check how it crops everywhere else. If you want practical help with visuals, the social media learning hub has creative guidance for beginners.
Writing a Hook That Works in Three Seconds
The hook is the first line of text or the first three seconds of video. Most people decide to keep watching or keep scrolling that fast. Start with the problem, not your logo. “Tired of cakes that dry out by day two?” beats “Welcome to Sweet Crumbs Bakery” every single time.
Show a face if you can, show the product in use, and put movement in the first frame. A weak hook can’t be rescued by a great ending, because nobody gets that far. Write five different hooks for the same product and test them against each other.
Ad Copy That Sells Without Sounding Pushy
Good ad copy is short, specific and sounds like a person. Say what the product is, who it is for, what it costs or what offer is running, and what to do next. Use real numbers when you can: “Delivered in 24 hours across Bhubaneswar” is stronger than “fast delivery.”
Meta also has rules about personal attributes, so avoid phrases like “Are you overweight?” that imply you know something about the viewer. Say “Want to lose 5 kg before the wedding?” instead, and keep before and after claims honest, because misleading ones get rejected quickly.
How to Test Creative Without Burning Budget
Put three to five ads in one ad set and let Meta show them all for a few days. Don’t cut anything in the first 48 hours, since early numbers swing a lot. After that, pause the clear losers, keep the winners, and add fresh variations on the winning idea.
Change one element at a time: the first image, the headline, or the offer. If you change everything at once, you will never know what caused the improvement. A simple spreadsheet logging each test and result will teach you more over three months than any course.
How to Launch Your First Campaign Step by Step
Reading about Meta Ads for Beginners only goes so far, so here is the actual path from empty account to live campaign. Follow these steps in order and you will avoid the most common launch mistakes. Keep your first campaign simple and treat it as a learning exercise.
Step 1: Pick Your Goal and Build Your Offer
Before opening Ads Manager, decide what a “win” looks like. For a baker, it might be 20 WhatsApp orders in two weeks. For an online store, maybe 15 purchases at under ₹300 each. Write that number down, because you will judge the campaign against it later.
Then check your offer. Is the price clear? Is there a reason to buy now, like a launch discount or free delivery? Does your page or WhatsApp chat respond quickly? Fix those basics first, because ads will only multiply whatever you already have.
Step 2: Create the Campaign and Choose the Objective
In Ads Manager, click Create, pick your objective (Sales or Leads for most beginners), name the campaign clearly, like “Cakes_Sales_Oct2026,” and decide whether to use Advantage+ campaign budget. Clear naming looks boring now, but saves you when you have 20 campaigns running later.
If you pick a special ad category, like housing, employment or credit, Meta restricts targeting options, so only choose it if it truly applies to you. Otherwise leave it at none.
Step 3: Set Up the Ad Set
Choose your conversion event (like Purchase or Lead), set your daily budget, pick your audience, and decide on placements. For beginners, leaving placements on Advantage+ placements is a sensible default, since it lets Meta find the cheapest spots across Facebook and Instagram.
Set the schedule to start now unless you want it to begin later. Double check the location setting, because the default “people living in or recently in this location” is usually right, but some businesses want only people living there.
Step 4: Build the Ad and Submit
Upload your image or video, write your primary text, headline and description, add a call-to-action button like “Shop now” or “Send message,” and enter the destination URL or WhatsApp number. Use the preview tool to check how it looks on mobile feed, Stories and Reels.
Hit publish and wait. Most ads are reviewed within 24 hours, sometimes faster. If the ad is rejected, read the reason in Account Quality, fix the specific issue, and request a review instead of just creating the same ad again.
Step 5: Leave It Alone for a While
The hardest part for beginners is doing nothing. Don’t edit the ad set every few hours, because every significant change can restart the learning phase. Check once a day, look at spend and results, and make decisions after at least three to five days of data.
Exceptions exist. If an ad is spending heavily with zero clicks, or a typo went live, fix it right away. Otherwise patience is a skill here, and it is one of the cheapest ways to save money.
Reading Your Results and Fixing Common Mistakes
Launching is the easy part. The real skill in Meta Ads for Beginners is reading what happened afterwards and knowing what to change. Numbers can look confusing at first, but a handful of metrics tell you almost everything you need to know about what is working and what is quietly draining money.
Which Metrics Actually Matter
Start with cost per result, which tells you what a lead or purchase costs. Then check return on ad spend (ROAS), which is revenue divided by ad spend. A ROAS of 3 means ₹3 back for every ₹1 spent. After that, look at CTR to judge creative strength and frequency to spot fatigue.
Ignore vanity numbers like reach, likes and impressions on their own. They feel good and tell you almost nothing about profit. You can find a good set of tracking aids in the tools section of the learning hub when you want to organize reporting.
Diagnosing a Campaign That Isn’t Working
Low CTR means the creative or hook is weak, so change the ad. Good CTR but few conversions points to a problem after the click, like a slow page, confusing checkout or an offer that doesn’t match the ad. High CPM with normal CTR usually means a competitive audience or a busy season.
Work through it in order: creative first, then landing page, then audience, then budget. Most beginners change the audience first, because it feels technical, but the fix is more often in the ad itself.
The Mistakes That Burn Beginner Budgets
The usual suspects are picking the wrong objective, skipping the pixel, spreading a small budget across too many ad sets, editing constantly during learning, and sending traffic to a slow or confusing page. Another common one is judging after one day, when results are still noise.
Then there is the “boosted post forever” habit, where people never move beyond the Boost button. If your business depends on leads or sales, spend an hour learning Ads Manager. It pays back quickly.
Learning From Real Campaign Results
The best education is looking at what others have actually done and how their numbers moved. The case studies hub shows real campaign breakdowns with before and after figures. You can also use Meta’s free Ad Library at facebook.com/ads/library to see which ads your competitors are running and how long they have been live.
An ad that has run for months is probably profitable, because nobody keeps paying for a loser that long. Study those, borrow the ideas (not the exact ads), and test your own versions.
Conclusion
Meta Ads for Beginners comes down to a handful of habits. Understand that the auction rewards relevant, well-made ads. Pick the objective that matches your real goal. Install tracking before spending. Start with a budget big enough to learn from, test creative in small batches, and read your numbers honestly. None of this needs a big agency or a huge budget, just patience and a willingness to look at what the data says instead of what you hoped it would say.
So here is your next move. Set up your Page, pixel and ad account this week, write down one clear goal like “20 leads under ₹150 each,” and launch a single small campaign with three ads. If you want a full structured path beyond this guide, the Alpha Marketer Foundation Program walks through paid ads and the rest of digital marketing step by step.
Frequently Asked Questions
What are Meta Ads?
Meta Ads are paid advertisements that appear on Facebook, Instagram, Messenger and Meta’s Audience Network. You create and manage them in Meta Ads Manager, choosing an objective, audience, budget and creative. Meta then shows your ad to people it predicts are likely to take the action you want.
How does Facebook advertising work?
Facebook advertising works through an auction that runs each time someone is about to see an ad. Meta compares advertisers based on their bid, how likely the person is to act, and the quality of the ad. The ad with the highest total value wins the spot, and you pay based on your chosen result.
How much do Meta Ads cost for a beginner?
You can technically start with a small daily budget, but a realistic starting point in India is ₹500 to ₹1,000 per day for one or two weeks. That gives Meta enough results to learn from. Your actual cost per lead or sale depends on your industry, offer, creative and audience.
Is Meta Ads better than Google Ads?
Neither is better across the board. Google Ads catches people already searching for something, so intent is higher. Meta Ads finds people who weren’t searching but fit your customer profile, which suits discovery and visual products. Many businesses use both, with Meta for awareness and Google for demand that already exists.
What is the difference between boosting a post and using Ads Manager?
Boosting a post is a simplified shortcut with limited options for objective, audience and tracking. Ads Manager gives full control over objectives, placements, budgets, custom audiences and pixel-based optimization. If you want leads or sales instead of just engagement, Ads Manager is the better choice.
What is the Meta Pixel and do I need it?
The Meta Pixel is a code snippet on your website that records visitor actions like page views, add to cart and purchases. You need it if you want Meta to optimize for conversions or build retargeting audiences. Without it, the system has very little data to learn from, and your results usually suffer.
How long does it take for Meta Ads to work?
Expect the first three to seven days to be noisy while the learning phase runs. Many campaigns need around two weeks before the numbers settle enough to judge. Judging after one day usually leads to bad decisions, because early results swing a lot.
What is the learning phase in Meta Ads?
The learning phase is the period when Meta tests different people to see who responds to your ad. An ad set generally needs about 50 optimization events in a seven-day window to exit it. Making big edits during this period, like changing budget or audience sharply, can reset the learning.
Why was my Meta ad rejected?
Ads are usually rejected for breaking advertising policies, such as misleading claims, prohibited content, personal attribute targeting in the copy, or low-quality landing pages. Check the reason in Account Quality, fix the specific problem, and request a review. Creating the same ad repeatedly can hurt your account standing.
What is a good ROAS for Meta Ads?
It depends on your profit margins. A ROAS of 3, meaning ₹3 revenue per ₹1 of spend, is a common target for many e-commerce brands, but a business with high margins may profit at 2, while one with thin margins may need 5 or more. Work out your break-even ROAS before judging.
Can small businesses in India use Meta Ads effectively?
Yes. Local shops, bakeries, coaching centres, salons and online stores all use Meta Ads to reach nearby customers with small budgets. Click-to-WhatsApp ads and instant lead forms are especially popular in India because they let people reach a business without leaving the app.
How many ads should I run at once as a beginner?
Start with one campaign, two or three ad sets and three to five ads in each. This gives Meta enough variety to find a winner without splitting your budget too thin. Adding more ads later is easy, but starting with too many makes it hard to learn anything.
Do I need a website to run Meta Ads?
Not always. You can run ads that send people to Instagram, Messenger or WhatsApp, or use instant forms to collect leads inside Meta. A website helps with tracking and conversions through the pixel, though, so e-commerce businesses and anyone wanting detailed data should have one.